Follow me on my project as I purchase a Yamaha XS650, get it running and registered and then chop it into what hopefully is a sweet scoot that I can get out on and tear up the roads.

Monday, October 18, 2010

Rebuilding the Forks Part 2

When it came time to remove the stanchion from the fork leg, I was able to loosen the allen bolt, but as most people experience, the bolt then just started spinning the damper rod in the bottom of the leg, not allowing you to get it undone all the way to pull apart.

After a lot of playing around with putting the fork back together to see if it would hold the damper rod, I jumped on the net and did a fair bit of reading and found that you need to either slide in a piece of dowel and apply downwards pressure or build a tool to hold the damper still.

After reading just about every forum I could find about xs650's I stumbled across one post that stated that it was 1978 that the damper rod was changed over and bikes that where made in mid 78 or later like my 81, need to have a 17mm hex bit inserted into the top of the damper rod to hold it still. Not having a 17mm hex bit, I read on and found that people have sometimes used threaded rods and several 10mm nuts to insert down the fork tube to hold the damper, as a 10mm bolt/nut has almost a perfect 17mm diameter on it.

I checked my toolbox and through the garage but just happened to have everything but a 10mm bolt and nuts, so I ran down to Bunnings and grabbed a bolt and 2 nuts to make my 17mm hex bit.

With a bit of thread lockerI spun on the two nuts to the bolt and tightened them up as much as I could and let the thread locker cure over night, and this evening put together the tool that would hopefully let me get the fork leg separated.

I grabbed my largest extension bar, a reducer and my 17mm socket and put in my handmade 17mm hex bit and slid it down the fork tube, and grabbed my allen key and went at the bolt and sure enough, with a few turns it loosened right up and the stanchion and the fork leg separated.

Over the next few days I will now clean out the inside and outside of the fork parts and then replace the oil seal, and then do the same to the other fork.

Here is the tool and the extension bar I used get the damer rod allen bolt out.


Monday, October 11, 2010

Rebuilding the Forks

Looking at the posts here, today is 3 months to the day since I last did some work on the bike and posted it up.

I have had a tonne of things going on over the last 3 months, with plenty of full weekends and things to do, progress on the bike has slipped dramatically, but not I am putting an end to that.

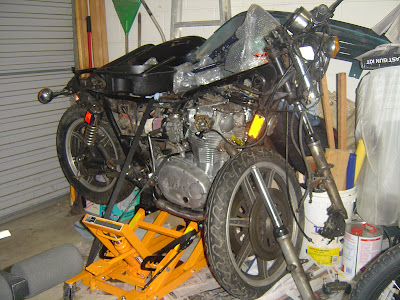
A couple of days before Father's Day I purchased a hydraulic motorcycle/atv lift from Repco, which I got on special for $149 down from $230 or so. I am fairly happy with the lift except that it is not perfectly level, so when there is some weight on it, you can rock it side to side a little, but besides that it is perfect.

I currently have the bike up on the lift, and the other week I fought with the cotter pin on the castled nut and finally got the front wheel off the bike.

After reading up on starting to dismantle the forks, I have finally gone for it and I have started to dismantle the forks ready to clean them up, put in some new seals, new fluid and make them work a little better than they did before.

So far I have removed the top cap, fork spring top and spring, and I have drained the oil. The sludge that came out of the fork sure wouldn't have been much good on the road, so I am glad that I have done this now. Tomorrow night I am going to try and separate the stanchion and the lower legs, clean them inside and out and then after that I will fit some new oil seals and rebuild them with new oil.

After not having touched the bike lately, I have really missed getting my hands dirty and getting some work done. I will not be leaving it anywhere near this long before doing more work.

Below are some pictures of how the bike sits now, and the messy garage I have to work with:


I have done some work in the background for the bike recently - I have worked out what tyres I am going to run, purchased new wheel bearings, head stem bearings, ordered the rear fender that I plan on running when the bike is hard tailed, chosen the tyres I will be running and I have also decided on the tank I will use, which I will be ordering shortly. I will get some pictures up of all of these soon in another post.